
 By TechOriginHub Editorial Team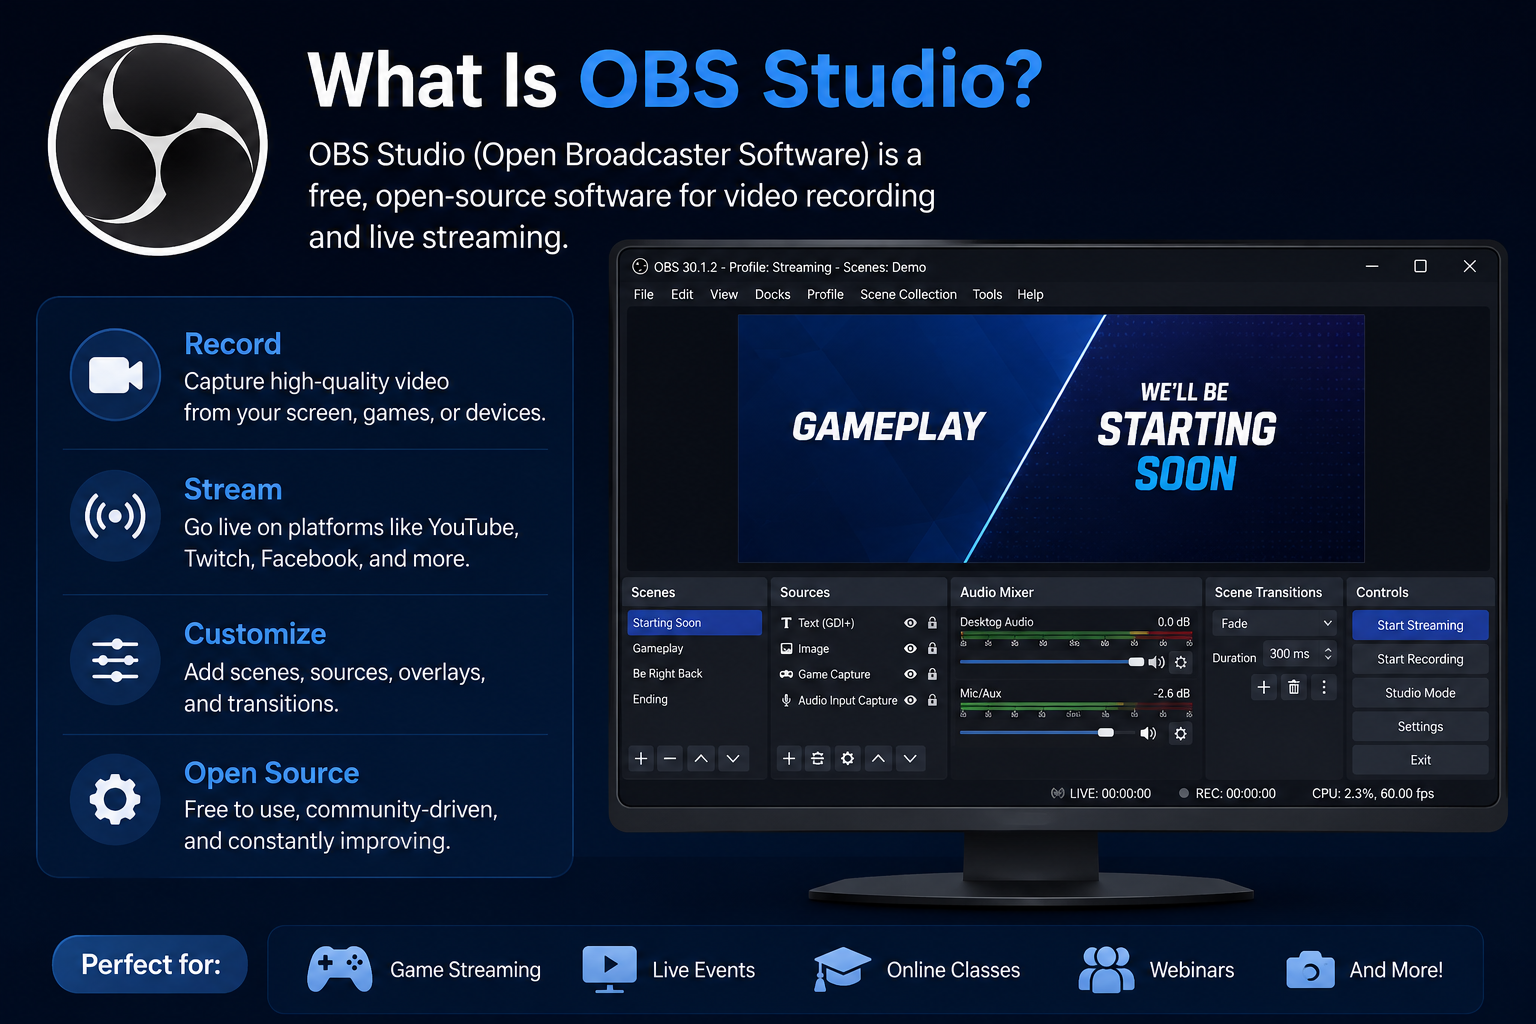
Introduction
Whether you have watched a live stream on Twitch, attended an online class, or followed a software tutorial on YouTube, there is a strong chance the person behind the camera was using OBS Studio to capture and broadcast that content. What is OBS Studio? It is a free, open-source software application for screen recording and live streaming that has become the industry standard for content creators, gamers, educators, business professionals, and broadcasters around the world.
Despite being completely free, OBS Studio delivers a level of power and flexibility that many paid alternatives struggle to match. It runs on Windows, macOS, and Linux, supports virtually every major streaming platform, and handles everything from simple screen recordings to complex multi-source live productions with professional audio mixing and real-time scene transitions.
In 2026, OBS Studio remains the go-to choice for millions of users who want professional-quality output without professional-level software costs. This comprehensive guide covers everything you need to know, from how OBS Studio works and what it can do, to step-by-step setup instructions, recommended settings, and an honest comparison with its main competitors.
Quick Answer (Featured Snippet)
OBS Studio is a free, open-source software application for live streaming and screen recording. It is developed by the OBS Project and available on Windows, macOS, and Linux. OBS Studio supports multiple scenes, audio mixing, filters, plugins, and integrations with platforms like YouTube, Twitch, and Facebook Live. It is used by gamers, educators, businesses, and content creators worldwide.
What Is OBS Studio?
Definition
OBS Studio, which stands for Open Broadcaster Software Studio, is a free and open-source application for video recording and live streaming. It allows users to capture video and audio from multiple sources simultaneously, mix and arrange them into professional-looking scenes, and either record the result as a local video file or broadcast it live to streaming platforms like YouTube, Twitch, Facebook Live, and many others.
The software gives users complete control over every aspect of their recording or stream, including video resolution, frame rate, bitrate, audio levels, scene transitions, and visual filters. This depth of control is what makes OBS Studio appeal equally to casual users recording a quick tutorial and professional broadcasters running multi-camera live productions.
A Brief History
OBS Studio was originally created by Hugh “Fenris” Bailey and first released in 2012 under the name Open Broadcaster Software. The original version was Windows-only and attracted a passionate community of streamers and content creators. As the user base grew, the development community rebuilt the software from the ground up using a new cross-platform architecture, releasing OBS Studio in 2016 as the modern, actively maintained version that supports Windows, macOS, and Linux simultaneously.
The OBS Project is a nonprofit organization that oversees development. It relies on community contributions, open-source collaboration, and supporter donations rather than commercial funding. This structure ensures the software remains permanently free and community-driven rather than beholden to commercial interests.
Why OBS Studio Is Popular
OBS Studio’s dominance in the streaming and recording software market comes down to a combination of qualities that no competitor has matched at the same price point of zero. First, it is genuinely powerful, offering professional-grade features that rival expensive commercial software. Second, it is completely free with no watermarks, time limits, feature restrictions, or subscription requirements. Third, its active open-source community continuously develops new plugins and improvements that extend the software’s capabilities far beyond its core feature set.
Open-Source Software Overview
Being open-source means that OBS Studio’s entire source code is publicly available for anyone to review, modify, and improve. This transparency builds trust, as independent security researchers and developers can verify exactly what the software does on your system. It also enables the creation of community plugins that add features the core team has not officially implemented, giving OBS Studio an extensibility that closed-source commercial tools cannot easily replicate.
How Does OBS Studio Work?
OBS Studio organizes your recording or streaming production around several core concepts. Understanding these fundamentals makes the rest of the software immediately intuitive.
Scenes
A scene in OBS Studio is a complete snapshot of your production layout at a given moment. Think of each scene as a preset arrangement of visual elements that you can switch between instantly during a recording or live stream. For example, a streamer might have a Game Scene showing their gameplay with a small webcam overlay, a Be Right Back Scene showing a static holding image with music, and a Just Chatting Scene showing their full webcam with a chat overlay.
Switching between scenes happens with a single click or a keyboard hotkey, making complex live productions feel effortlessly smooth for the audience even when the creator is managing everything alone.
Sources
Sources are the individual elements that populate each scene. A source can be a window capture, a display capture, a webcam feed, an image file, a text overlay, a web browser window, a media file, an audio input device, or dozens of other types. Each source appears as a layer within the scene, and you can resize, reposition, and reorder sources to create exactly the visual layout you want.
A typical streaming scene might contain three sources: a Game Capture source showing the gameplay, an Image source showing a decorative frame overlay, and a Video Capture Device source showing the streamer’s webcam in the corner.
Audio Mixer
The Audio Mixer panel displays all active audio sources as separate channels with individual volume faders, mute buttons, and VU meter level indicators. You can manage your microphone, desktop audio, game audio, and any additional audio sources as completely independent channels with separate volume levels and applied audio filters.
This separation is critically important because it allows you to adjust game audio and microphone levels independently in real time during a live stream without affecting each other. Applying noise suppression to the microphone channel, for example, does not affect the desktop audio channel at all.
Studio Mode
Studio Mode is a feature that enables professional-grade scene transitions without the audience ever seeing an unfinished state. When Studio Mode is active, OBS Studio displays two preview windows side by side. The left window shows the Preview, which is what you are currently preparing. The right window shows the Program, which is what your audience currently sees.
You make changes in the Preview window and then click Transition to push those changes to the Program window when you are ready. This allows you to add new sources, rearrange elements, or prepare a completely different scene configuration behind the scenes without any of that preparation being visible to viewers.
Recording
OBS Studio records your production directly to your local storage as a video file. You can choose from several container formats including MKV, MP4, MOV, and others, and select from multiple encoding options to balance recording quality against file size and system performance impact. MKV is generally recommended for local recording because it protects against data loss if the recording is interrupted unexpectedly.
Streaming
For live streaming, OBS Studio connects directly to streaming platforms through RTMP, RTMPS, or SRT protocols. You enter your stream key from the platform of your choice, configure your streaming settings including bitrate and encoder, and click Start Streaming. OBS Studio then encodes your production in real time and transmits it continuously to the streaming platform, which distributes it to your audience.
Key Features of OBS Studio
OBS Studio delivers an extensive range of features that explain its dominance in the streaming and recording software market.
OBS Studio Features Table
| Feature | Description |
|---|---|
| Screen Recording | Captures full display, specific windows, or selected regions |
| Live Streaming | Broadcasts to YouTube, Twitch, Facebook, and other platforms |
| Unlimited Scenes | Creates as many scene presets as your production requires |
| Multiple Sources | Combines cameras, gameplay, images, text, and browsers in one scene |
| Audio Mixer | Manages multiple audio channels with independent volume controls |
| Audio Filters | Applies noise suppression, compressors, limiters, and EQ to audio |
| Chroma Key | Removes green screen backgrounds for virtual background replacement |
| Studio Mode | Prepares scene changes behind the scenes before pushing live |
| Plugins | Extends functionality through community-developed add-ons |
| Virtual Camera | Outputs OBS as a camera source for video conferencing apps |
| Hotkeys | Assigns keyboard shortcuts to any OBS action or scene switch |
| Custom Transitions | Creates stinger, fade, cut, and custom scene transition effects |
| Multi-Platform Support | Runs natively on Windows, macOS, and Linux |
| High-Quality Encoding | Supports x264, NVENC, AMD AMF, Apple VT, and QuickSync encoders |
| Replay Buffer | Saves the last few minutes of footage when a hotkey is pressed |
| Browser Source | Embeds live web content and stream alerts directly into scenes |
| Video Capture | Captures footage from external cameras and capture cards |
| Image and Slideshow | Displays static images or cycling slideshows in scenes |
| Text Sources | Adds customizable text overlays with dynamic GDI and FreeType rendering |
| Scene Collections | Saves entire scene and source configurations as exportable collections |
| Performance Optimization | Hardware encoding offloads processing from CPU to GPU |
| Multiview | Displays all scenes simultaneously in a monitor view for live production |
Benefits of OBS Studio
Using OBS Studio brings an impressive range of practical advantages that justify its enormous popularity worldwide.
OBS Studio Benefits Checklist
| Benefit | Description |
|---|---|
| Completely Free | No cost, no watermarks, no time limits, no subscription required |
| Open Source | Transparent, community-audited codebase that anyone can inspect |
| Cross-Platform | Runs on Windows, macOS, and Linux with consistent features |
| Professional Quality | Delivers broadcast-grade recording and streaming output |
| Unlimited Scene Complexity | Handles simple and highly complex productions equally well |
| Hardware Encoder Support | Uses GPU encoding to reduce CPU load significantly |
| Platform Flexibility | Streams to any platform supporting RTMP protocol |
| Plugin Ecosystem | Hundreds of community plugins extend core functionality |
| Virtual Camera Output | Integrates with Zoom, Teams, and other conferencing tools |
| Active Community | Large, helpful community provides tutorials and troubleshooting support |
| No Usage Limits | Records or streams for any duration without restrictions |
| Lightweight on Resources | Efficient performance when configured correctly |
| Customizable Interface | Docks, panels, and layout can be arranged to suit your workflow |
| Regular Updates | Active development brings new features and bug fixes consistently |
| Chroma Key Support | Enables professional green screen production at no extra cost |
| Audio Control | Independent channel mixing for professional audio management |
| Replay Buffer | Never misses important moments with instant video capture |
| Scene Collections | Easily switches between completely different production setups |
| Free Educational Resource | Massive library of community tutorials available for self-learning |
| Industry Standard | Skills learned in OBS Studio transfer directly to professional broadcasting |
Common Uses of OBS Studio
OBS Studio serves a remarkably diverse range of creators and professionals across many different fields.
YouTube Live Streaming is one of the primary use cases for OBS Studio. YouTube creators use it to broadcast live gaming sessions, commentary streams, live podcast recordings, and real-time tutorial content to their subscriber base. OBS Studio’s integration with YouTube’s streaming infrastructure is seamless, and the platform’s recommended settings align closely with what OBS delivers optimally.
Twitch Streaming is where OBS Studio’s reputation was largely built. Twitch is the world’s dominant gaming live stream platform, and OBS Studio has been the preferred broadcasting tool for Twitch streamers since the platform’s early days. Its precise bitrate controls, scene management, and plugin support for Twitch-specific alerts and overlays make it ideal for gaming content.
Facebook Live broadcasts for businesses, nonprofits, community organizations, and content creators all benefit from OBS Studio’s professional production capabilities. Organizations use it to broadcast events, product launches, and community announcements with a visual polish that a simple mobile broadcast cannot achieve.
Online Teaching has become one of the fastest-growing use cases for OBS Studio since the surge in remote education. Teachers and course creators use it to record high-quality video lessons, capture screen demonstrations of software or concepts, and stream live classes with webcam, presentation slides, and annotation software all combined in a single polished scene.
Business Presentations and Webinars delivered through OBS Studio stand out from standard screen-share presentations. Marketing teams, sales professionals, and corporate trainers use OBS to combine their webcam, slide presentations, product demonstrations, and branded overlays into a professionally produced webinar that reflects well on their organization.
Podcast Recording with OBS Studio provides podcasters with a free alternative to paid recording software. OBS captures multiple audio sources independently, allowing two or more hosts to be recorded on separate channels for cleaner post-production editing.
Gameplay Recording for video editing and YouTube upload is a common solo use case where OBS Studio records gameplay footage directly to a local file with no streaming required. Game capture with OBS delivers high-quality footage at configurable resolutions and frame rates with minimal performance impact on the game itself.
Product Demonstrations and Software Tutorials benefit from OBS Studio’s ability to combine a high-quality screen capture with a webcam picture-in-picture and professional audio, creating demonstration videos that communicate clearly and look genuinely professional without any video production budget.
How to Download and Install OBS Studio
Installing OBS Studio is a quick and straightforward process. Follow these steps to get the software running on your system.
System Requirements
Before downloading, verify that your computer meets the minimum requirements for running OBS Studio effectively in 2026.
- Operating System: Windows 10 or later (64-bit), macOS 11 Big Sur or later, or a modern Linux distribution
- Processor: Modern multi-core CPU, Intel Core i5 or AMD Ryzen 5 or better recommended
- RAM: 4 GB minimum, 8 GB or more strongly recommended for smooth streaming and recording
- Graphics Card: DirectX 11 compatible GPU for Windows, Metal-compatible GPU for macOS
- Storage: At least 400 MB for OBS installation, plus additional space for recorded video files
- Internet: Stable broadband connection for live streaming, minimum 5 Mbps upload recommended
- Microphone and Webcam: Required for audio capture and video input sources
OBS Studio Setup Checklist
| Step | Task |
|---|---|
| 1 | Verify system meets minimum requirements |
| 2 | Download OBS Studio from obsproject.com |
| 3 | Run installer with administrator privileges |
| 4 | Complete the Auto-Configuration Wizard |
| 5 | Create your first scene |
| 6 | Add and configure your sources |
| 7 | Set up audio mixer levels |
| 8 | Configure video and output settings |
| 9 | Enter your streaming platform key |
| 10 | Run a test recording or stream before going live |
Download OBS Studio
Always download OBS Studio exclusively from the official website at obsproject.com to ensure you receive the legitimate, malware-free version. Navigate to the Download section and select your operating system. The website automatically detects your operating system and highlights the appropriate installer. Also browse the Plugins section of the OBS forum at obsproject.com/forum for community-developed extensions once you are comfortable with the core software.
Install on Windows
After downloading the Windows installer, double-click the file and accept any User Account Control prompts requesting administrator permission. The installer presents a straightforward setup wizard where you can choose the installation directory and select optional components. Accept the default settings unless you have specific reasons to change the installation location. After installation completes, the Auto-Configuration Wizard launches automatically to help you configure initial settings.
Install on macOS
On macOS, open the downloaded DMG file and drag the OBS Studio application to your Applications folder. When you first launch OBS Studio, macOS will ask for permission to access your screen, microphone, camera, and other system resources. Grant all requested permissions to ensure OBS can capture the sources you need. If any permissions are blocked, navigate to System Settings, Privacy and Security, and enable access for OBS Studio in each relevant category.
Install on Linux
On Ubuntu and Debian-based distributions, the easiest installation method is through the official OBS Studio PPA repository. Add the repository, update your package list, and install OBS Studio using the APT package manager through the terminal. Alternatively, OBS Studio is available as a Flatpak package from Flathub, which works across most Linux distributions. For RPM-based distributions, the RPMFusion repository provides OBS Studio packages compatible with Fedora and CentOS systems.
First-Time Setup Wizard
When you launch OBS Studio for the first time, the Auto-Configuration Wizard runs automatically. This wizard analyzes your hardware capabilities and internet connection speed, then recommends optimal settings for either streaming or recording based on your use case preference. Accept the wizard’s recommendations as a reliable starting point and adjust settings later once you understand how each option affects your output quality and system performance.
How to Set Up OBS Studio for Beginners
With OBS Studio installed, follow these steps to configure your first functional streaming or recording setup.
Create Your First Scene
In the Scenes panel in the bottom-left corner of the OBS interface, click the plus icon to create a new scene. Give it a descriptive name like Main Stream or Gameplay that reflects what this scene will show. You can create as many scenes as you need for your production and switch between them instantly during a session.
Add Sources
With your scene selected, click the plus icon in the Sources panel directly to the right of the Scenes panel. Select the type of source you want to add from the dropdown menu. For capturing gameplay, select Game Capture and choose the specific game or Capture any fullscreen application. For a webcam, select Video Capture Device and choose your camera from the device list. For capturing an entire monitor, select Display Capture and select your display. Resize and reposition each source by clicking and dragging the handles around it in the preview window.
Configure Audio
Open the Settings menu and navigate to the Audio tab. Set your Sample Rate to 44.1 kHz or 48 kHz and your Channels to Stereo for most use cases. In the Global Audio Devices section, assign your Desktop Audio device and your Microphone input device. Return to the main OBS interface and use the Audio Mixer panel to set appropriate volume levels, aiming for your microphone to peak around the negative 12 decibel range to avoid clipping while maintaining audibility.
Configure Video
Navigate to Settings and select the Video tab. Set your Base Canvas Resolution to match your monitor resolution, typically 1920 x 1080 for full HD setups. Set your Output Scaled Resolution to the resolution you want to stream or record at, typically 1920 x 1080 for 1080p output or 1280 x 720 if your internet upload speed or system performance requires a lower resolution. Set your Common FPS Value to 60 for smooth video or 30 if you need to reduce system load.
Recording Settings
Go to Settings, then Output, and select Recording. Choose your recording path where OBS will save your video files. Select MKV as your recording format for maximum reliability, as it protects against data loss if the recording stops unexpectedly. Set your video encoder to your GPU’s hardware encoder, NVENC for NVIDIA, AMF for AMD, or Apple VT for Mac, to reduce CPU load. Set your recording quality to High Quality or Indistinguishable from Lossless depending on your storage capacity.
Streaming Settings
In Settings under Stream, select your streaming service from the dropdown menu. Choose YouTube, Twitch, Facebook Live, or Custom RTMP for other platforms. For most major platforms, OBS Studio connects to your account directly through the Connect Account button, automatically retrieving your stream key. Alternatively, copy your stream key from your streaming platform’s dashboard and paste it manually into the Stream Key field.
Test Your Setup
Before going live for the first time, always run a private test. Start a recording and review the playback to check video quality, audio levels, and whether all sources are displaying correctly. For streaming, start a private or unlisted test stream and watch the output from another device to verify how your production appears to viewers. Check the Stats panel in OBS for dropped frames and CPU usage during the test to identify any performance issues before your real stream begins.
OBS Studio vs Streamlabs
Streamlabs, formerly known as Streamlabs OBS, is one of the most direct competitors to OBS Studio. Both tools are built on the same underlying OBS code base, but they take very different approaches to the user experience.
OBS Studio vs Streamlabs Comparison Table
| Feature | OBS Studio | Streamlabs |
|---|---|---|
| Cost | Completely free | Free with paid Ultra tier |
| Open Source | Yes | No (proprietary additions) |
| Ease of Use | Moderate learning curve | Easier for complete beginners |
| Performance | Better resource efficiency | Higher RAM and CPU usage |
| Customization | Extremely high | Moderate |
| Plugin Support | Extensive community plugins | Limited to built-in features |
| Built-in Overlays | No (manual setup or plugin) | Yes, large overlay library |
| Alert Integration | Via browser source or plugin | Built-in native integration |
| Theme Library | No | Yes |
| Cross-Platform | Windows, macOS, Linux | Windows, macOS |
| Multistreaming | Via plugin | Native (Ultra plan) |
| Stream Deck Support | Via plugin | Native |
| Cloud Backup | No | Yes (Ultra plan) |
| Best For | Experienced users, Linux users, power customization | Beginners, Twitch streamers wanting quick setup |
Overall, OBS Studio is the better choice for users who value performance, full customization control, plugin flexibility, and Linux compatibility. Streamlabs is more appealing to absolute beginners who want built-in stream alerts, overlays, and a more guided initial experience, though its higher resource consumption can be a real drawback on less powerful computers.
OBS Studio vs XSplit
XSplit is a commercial streaming and recording application that competes with OBS Studio in the professional content creator market.
OBS Studio vs XSplit Comparison Table
| Feature | OBS Studio | XSplit Broadcaster |
|---|---|---|
| Cost | Free | Paid subscription required for premium |
| Open Source | Yes | No |
| Ease of Use | Moderate | Easier initial setup |
| Performance | Excellent | Good |
| Scene Management | Excellent | Good |
| Plugin Support | Extensive community plugins | Limited |
| Virtual Camera | Yes (built-in) | Yes |
| Cross-Platform | Windows, macOS, Linux | Windows only |
| Built-in Scene Templates | No | Yes |
| Customer Support | Community forums | Official paid support |
| Multistreaming | Via plugin | Native (premium) |
| GPU Encoding | Yes | Yes |
| Watermark (free) | None | Present on free version |
| Best For | All users seeking free professional tool | Windows users wanting guided experience |
XSplit offers a polished interface and helpful guided setup, which appeals to newer users willing to pay for a subscription. However, OBS Studio matches or exceeds XSplit’s core capabilities in every significant area while remaining completely free, cross-platform, and more flexible through its plugin ecosystem.
Best OBS Studio Settings
Choosing the right settings makes a significant difference in output quality and system stability. Here are the recommended configurations for the most common use cases.
For YouTube Streaming: Use the x264 encoder or hardware encoder at a bitrate between 4,500 and 9,000 Kbps for 1080p at 60 frames per second. Set the keyframe interval to 2 seconds, which YouTube recommends for optimal quality. Use the High profile for x264 and set your audio bitrate to 160 Kbps or higher.
For Twitch Streaming: Twitch has a bitrate cap of approximately 6,000 Kbps for standard streamers. Set your video bitrate between 3,500 and 6,000 Kbps depending on your upload speed reliability. Use hardware encoding if available to reduce CPU load. Set your resolution to 1080p at 60 frames per second or 720p at 60 frames per second if your connection cannot support higher bitrates reliably.
For 1080p Recording: Set your output resolution to 1920 x 1080 and use either CQP mode with the hardware encoder or CRF mode with x264 for quality-based encoding. A CQP or CRF value between 18 and 23 provides excellent quality with manageable file sizes for most content types.
For 4K Recording: Set your base and output canvas to 3840 x 2160. Use hardware encoding exclusively for 4K, as software x264 encoding at 4K resolution requires an extremely powerful CPU. Ensure your storage drive is an SSD with sufficient write speed to handle the large file sizes that 4K recording generates.
For Low-End PCs: Lower your output resolution to 720p and reduce your frame rate to 30 frames per second. Use hardware encoding with a high CQP value around 28 to 32 to reduce encoding workload. Close all unnecessary background applications before streaming or recording to maximize available resources for OBS.
For High-End PCs: Use hardware encoding for efficiency and set a low CQP value between 16 and 18 for near-lossless recording quality. Enable 1080p or 4K output at 60 frames per second. Use the NVENC or AMF encoder with the Quality or Max Quality preset for the best output while still offloading most processing work to your GPU.
Common OBS Studio Problems and Solutions
Even experienced OBS users encounter technical issues occasionally. Here are the most common problems and reliable solutions.
Black Screen on Display or Game Capture
A black screen source is one of the most commonly reported OBS issues. On Windows, the most frequent cause is a conflict between OBS’s capture method and your GPU configuration. Right-click your desktop, open your NVIDIA or AMD graphics control panel, and set OBS Studio to run on your integrated graphics rather than your dedicated GPU. Alternatively, run OBS Studio as administrator, which resolves permission-related black screen issues for many users.
No Audio in Recording or Stream
If your recording contains no audio, first check that the correct audio devices are selected in Settings under Audio. Verify that no sources in the Audio Mixer are muted and that fader levels are not set to zero. Also confirm that your operating system has not muted OBS in the Windows Volume Mixer. For microphone issues specifically, check that the microphone is selected as the default recording device in Windows sound settings.
Lag During Recording
Recording lag typically results from insufficient storage write speed. Ensure your recordings save to an SSD rather than a slow traditional hard drive. Also switch to hardware encoding to reduce CPU load. Enabling the High Performance power plan in Windows prevents your CPU from throttling its speed during intensive recording sessions.
Dropped Frames
Dropped frames during a stream indicate a network connection problem between OBS and your streaming server. First, try switching to a closer streaming server through your platform’s server selection option. Reduce your streaming bitrate to a level your connection can sustain consistently. Also disable any VPN or bandwidth-heavy applications that may be competing with your stream for available upload capacity.
High CPU Usage
High CPU usage occurs when you use software x264 encoding instead of hardware encoding. Switch to NVENC, AMF, or Apple VT encoding in your Output settings to shift encoding workload from your CPU to your GPU. Also reduce the number of browser sources in your scenes, as each active browser source runs its own rendering process that consumes meaningful CPU resources.
Stream Disconnects
Repeated stream disconnections usually indicate network instability rather than an OBS configuration problem. Switch from Wi-Fi to a wired ethernet connection if possible, as wired connections provide significantly more stable and consistent upload bandwidth. Also review your router’s QoS settings to prioritize OBS traffic. Reducing your streaming bitrate by 10 to 20 percent also helps maintain a stable connection on inconsistent network connections.
Tips to Use OBS Studio More Efficiently
Adopting these practices will help you get dramatically more from OBS Studio with less frustration.
- Always run OBS Studio as administrator on Windows. This resolves the majority of game capture and permission-related issues before they occur.
- Use hardware encoding whenever your GPU supports it. NVENC, AMF, and Apple VT encoders reduce CPU usage dramatically compared to software x264 encoding.
- Save recordings in MKV format first. MKV protects against file corruption if the recording stops unexpectedly, and you can remux to MP4 afterward using OBS’s built-in Remux Recordings tool.
- Use the Auto-Configuration Wizard for your initial settings. It provides a reliable hardware-appropriate starting point that you can refine later.
- Record to an SSD rather than a hard drive. Slow storage causes dropped frames in recordings regardless of how powerful your CPU and GPU are.
- Create separate scenes for every segment of your production. Starting screen, main content, break screen, and ending screen scenes make your stream or video look professionally produced.
- Use hotkeys for scene switching. Assigning keyboard shortcuts eliminates the need to click in the OBS window during a live stream, keeping your focus on the content.
- Apply noise suppression to your microphone source. The RNNoise plugin provides significantly better noise reduction than OBS’s built-in filter and is free to download.
- Enable the Replay Buffer feature. This allows you to instantly save the last few minutes of footage at any moment using a hotkey, perfect for capturing unexpected highlights.
- Use Studio Mode when making live changes. Always prepare scene adjustments in the preview before pushing them to the live output to avoid showing incomplete states to your audience.
- Keep OBS Studio updated. New versions frequently include important bug fixes, performance improvements, and new encoder support that improve stability.
- Monitor the Stats panel during streams. The Stats panel shows your current CPU usage, dropped frames, and rendering lag in real time, alerting you to problems before they become serious.
- Close unnecessary browser sources when not needed. Each browser source consumes CPU and memory even when off-screen.
- Use scene collections to organize different production setups. Create separate collections for streaming, recording, and virtual meetings rather than cramming everything into one complex setup.
- Set your canvas resolution before adding sources. Changing the canvas resolution after adding sources repositions and resizes them unpredictably.
- Use the Virtual Camera for video calls. OBS’s built-in virtual camera lets you use your full OBS scene as your camera input in Zoom, Teams, or Google Meet.
- Install the OBS Browser plugin for stream alerts. Browser sources allow you to add live donation alerts, follower notifications, and interactive overlays from services like Streamlabs or StreamElements.
- Test your setup offline before every important stream. A five-minute private test recording prevents technical issues from ruining a live event.
- Use dedicated audio monitoring headphones. Monitoring your audio output through headphones while streaming lets you hear exactly what your audience hears in real time.
- Back up your scene collections regularly. Export your scene collections from the Scene Collection menu and store copies in cloud storage to prevent losing complex setups after a system reinstall.
Frequently Asked Questions
What is OBS Studio?
OBS Studio is a free, open-source application for live streaming and screen recording developed by the OBS Project. It supports Windows, macOS, and Linux and allows users to capture video and audio from multiple sources, arrange them into customizable scenes, and either broadcast live to streaming platforms or save recordings to their local storage.
Is OBS Studio free?
Yes, OBS Studio is completely free with no limitations, no watermarks, no trial periods, and no premium tiers. It is funded through community donations and developed by volunteer contributors. Every feature in OBS Studio is available to every user at absolutely no cost, which is one of the primary reasons it has become the most widely used streaming and recording software in the world.
Is OBS Studio safe?
Yes, OBS Studio is safe software when downloaded from the official website at obsproject.com. Its open-source nature means the code is publicly auditable by anyone, making it very difficult for malicious code to be hidden within it. Always avoid downloading OBS from third-party websites, as unofficial versions may be modified to include malware.
What is OBS Studio used for?
OBS Studio is used for live streaming on platforms like YouTube, Twitch, and Facebook Live, recording gameplay footage, creating tutorial and educational videos, hosting online classes, conducting webinars, recording podcasts, producing product demonstrations, and using as a virtual camera source for video conferencing applications.
Can beginners use OBS Studio?
Yes, beginners can absolutely use OBS Studio, though it does have a moderate learning curve compared to simpler screen recording tools. The Auto-Configuration Wizard handles the most complex initial settings automatically. Starting with a simple two-source scene, one screen capture and one webcam, gives beginners a functional and professional-looking setup to build from as their comfort grows.
OBS Studio vs Streamlabs?
OBS Studio offers better performance, lower resource usage, greater customization depth, extensive plugin support, and full Linux compatibility. Streamlabs provides a more guided beginner experience with built-in stream alerts, overlay themes, and easier initial setup. For users comfortable learning the software, OBS Studio is the stronger long-term choice. For complete beginners wanting immediate Twitch streaming with minimal setup friction, Streamlabs may feel more accessible initially.
Does OBS Studio work on Mac?
Yes, OBS Studio is fully supported on macOS and runs natively on both Intel Macs and Apple Silicon Macs. The macOS version supports all core features including screen recording, live streaming, scene management, audio mixing, filters, and the virtual camera output. Some Windows-specific capture methods like Game Capture are not available on macOS, but Display Capture and Window Capture cover most recording needs effectively.
Can OBS Studio record gameplay?
Yes, OBS Studio excels at gameplay recording. The Game Capture source on Windows captures games directly with minimal performance impact, supporting games running in fullscreen, windowed, and borderless windowed modes. On macOS and Linux, Display Capture or Window Capture sources handle game recording effectively. OBS also supports capture cards for recording console gameplay from PlayStation, Xbox, and Nintendo Switch systems.
Can OBS Studio record the screen?
Yes, screen recording is one of OBS Studio’s core capabilities. The Display Capture source records your entire monitor output. The Window Capture source records a specific application window. The Region Capture option records a custom-defined portion of your screen. All capture types support high-resolution output at up to 4K resolution and 60 or more frames per second depending on your hardware capabilities.
Is OBS Studio good for YouTube?
Yes, OBS Studio is excellent for YouTube live streaming and video recording. It supports YouTube’s recommended streaming settings including CBR encoding, correct keyframe intervals, and high bitrate output. Many of the most successful YouTube creators use OBS Studio for both their live streams and their recorded video content because of its quality output and zero recurring cost.
Is OBS Studio good for Twitch?
Yes, OBS Studio was largely built on its reputation in the Twitch streaming community and remains the most popular choice among Twitch streamers. Its precise bitrate controls align perfectly with Twitch’s requirements, and its plugin ecosystem includes dedicated tools for Twitch-specific features like chat overlays, alerts, and channel point integrations through services like StreamElements and Streamlabs.
Can I use plugins with OBS Studio?
Yes, OBS Studio has a rich ecosystem of free community-developed plugins that extend its capabilities significantly. Popular plugins include OBS-NDI for network video sharing, Move Transition for animated scene switching, Advanced Scene Switcher for automated scene changes, Virtual Desktop Audio Capture for audio routing, and the OBS Browser plugin for interactive stream overlays. Plugins are available through the OBS Project forum and dedicated plugin repositories.
Does OBS Studio use a lot of CPU?
OBS Studio’s CPU usage depends heavily on your encoding settings. Software x264 encoding is CPU-intensive and can use 30 to 80 percent of your CPU on demanding settings. Switching to hardware encoding through NVENC for NVIDIA, AMF for AMD, or Apple VT for Mac reduces CPU usage to typically 5 to 20 percent while maintaining excellent output quality.
How do I reduce lag in OBS Studio?
Reduce lag in OBS Studio by switching to hardware encoding, lowering your output resolution and frame rate, recording to an SSD, closing unnecessary background applications, enabling the High Performance power plan in Windows, and reducing the number of active browser sources in your scenes. Checking the Stats panel during recording or streaming helps identify which specific performance metric is causing the lag.
Is OBS Studio worth using?
Yes, OBS Studio is absolutely worth using for anyone who creates video content, streams live, teaches online, or produces professional recordings. It delivers broadcast-quality output at no cost, runs on every major operating system, and offers more customization than many expensive paid alternatives. The time invested in learning OBS Studio pays dividends through the consistent quality it produces across every use case it supports.
People Also Ask
What is OBS Studio?
OBS Studio is a free, open-source video recording and live streaming application developed by the OBS Project. It runs on Windows, macOS, and Linux and supports streaming to platforms like YouTube, Twitch, and Facebook Live with full scene management, audio mixing, and plugin extensibility.
Is OBS Studio free?
Yes, OBS Studio is entirely free to download and use with no watermarks, feature restrictions, time limits, or subscription requirements. It is an open-source project funded by community donations and maintained by volunteer developers.
What is OBS Studio used for?
OBS Studio is used for live streaming, screen recording, gameplay capture, online teaching, webinar production, podcast recording, product demonstrations, tutorial creation, and as a virtual camera source for video conferencing applications.
How do I use OBS Studio?
Start by installing OBS Studio from obsproject.com and running the Auto-Configuration Wizard. Create scenes, add sources like screen capture and webcam, configure audio levels, set your video and output settings, enter your streaming platform key or recording path, and run a test before going live.
OBS Studio vs Streamlabs?
OBS Studio is better for performance, customization, plugin support, and Linux compatibility. Streamlabs is more beginner-friendly with built-in overlays and alerts. Most experienced streamers prefer OBS Studio for its lower resource usage and greater control.
Is OBS Studio safe?
Yes, OBS Studio downloaded from the official obsproject.com website is completely safe. Its open-source code is publicly auditable, making it one of the most transparent and trusted tools in the streaming software market.
Can OBS Studio record games?
Yes, OBS Studio’s Game Capture source on Windows records games directly with minimal performance impact. Display Capture and Window Capture sources handle gaming recordings on macOS and Linux effectively.
Can OBS Studio record the screen?
Yes, OBS Studio can record your full display, specific application windows, or a custom screen region using its Display Capture, Window Capture, and region selection tools.
Does OBS Studio work on Mac?
Yes, OBS Studio runs natively on macOS 11 Big Sur and later, including full support for Apple Silicon Macs, with all core recording and streaming features available.
Is OBS Studio worth using?
Yes, OBS Studio is one of the most valuable free software tools available for any content creator, educator, or professional who needs high-quality video recording and live streaming capabilities without recurring software costs.
Final Thoughts
OBS Studio has earned its place as the undisputed standard for free streaming and recording software through more than a decade of consistent improvement, community development, and genuine commitment to keeping a professional-grade tool accessible to everyone. Whether you are a first-time streamer figuring out your first scene, a university lecturer recording course materials, or a professional broadcaster running a multi-camera live production, OBS Studio scales to meet your needs without ever sending you an invoice.
Understanding what OBS Studio is and how to use it effectively opens up significant creative and professional possibilities. The initial learning investment is real but manageable, and the extensive library of community tutorials, official documentation, and active forum support means you never need to figure things out alone. Start with the Auto-Configuration Wizard, build your first simple scene, and add complexity gradually as your confidence grows.
For content creators who want professional output, complete control, cross-platform compatibility, and a thriving plugin ecosystem, all at zero cost, OBS Studio remains the clearest recommendation in the streaming and screen recording software market today and will continue to be for years ahead.
References
- OBS Project. (2026). OBS Studio Official Website. https://obsproject.com
- OBS Project. (2026). OBS Studio Documentation Wiki. https://obsproject.com/wiki
- OBS Project. (2026). OBS Project Community Forum. https://obsproject.com/forum
Technology Disclaimer
This article is for educational and informational purposes only. OBS Studio is an open-source software project developed and maintained by the OBS Project community. All feature descriptions, system requirements, recommended settings, plugin references, and platform compatibility information described in this article are based on information available at the time of writing and may change over time without notice as OBS Studio continues active development. Always download OBS Studio exclusively from the official OBS Project website at obsproject.com to ensure you receive legitimate, unmodified software. Streamlabs, XSplit, Twitch, YouTube, Facebook, NVIDIA, AMD, and Apple are trademarks of their respective owners. TechOriginHub is not affiliated with or endorsed by the OBS Project or any other company mentioned in this article.
 saman zahra